Francis Group PyMOL Tutorial
Matthew Francis and Richard Kwant, August 17, 2015
Getting Files
The Protein Data Bank (PDB, found at rcsb.org) is a central source for most protein structures. In fact, most publications require upload of structures to the PDB as a condition of publication. It is easiest to find structures on the PDB if you know their 4-character PDBID, but it's also possible to search a large number of fields to find a desired protein structure. These fields include protein name, organism, enzyme classification, structural domains, resolution, and sequence level details. Since there are many structures available, pay careful attention to which structure you choose. It's usually best to select a high resolution structure with no mutations.
To download a file, click the "download files" link in the top right of a structure page, and then select the text option. Alternatively, you can open Pymol and type
fetch followed by the PDBID to download the file and open it automatically.
Sessions, undo, and saving
You should not expect to be able to undo your actions in PyMOL. In some cases it is possible to undo actions, but the implementation is spotty and the results are inconsistent. Instead, it's best to save the session, which saves both the structures that are open, the current selections, and all of the formatting. To save a session, go to File → Save session as . . .
Pymol basics
Let's start by loading the structure of ubiquitin with PDBID 1UBQ. Type the following into the command prompt that starts with PyMOL> at the bottom of the screen and press enter.
fetch 1ubq
This command retrieves the .pdb file from the PDB server and opens it. If you look in the object pane on the right side of the window, you'll see 1UBQ listed. Each object loaded into Pymol has has five menus associated with it. They're shown as A, S, H, L, and C and stand for Actions, Show, Hide, Label and Color. These buttons provide access to many of the common actions that you'll want to perform in Pymol, but you can also accomplish every action by typing its command in the command line at the bottom of the screen.
Let's start by removing the water molecules from the structure
remove resn hoh
This command removes every residue in the structure with the name HOH, a residue name reserved for waters.
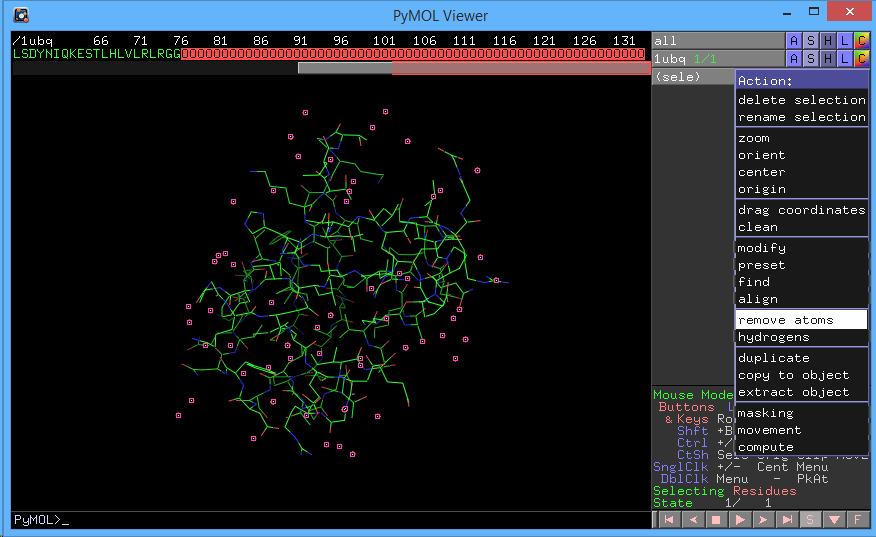
You can also remove waters by showing the sequence (Display → Sequence), selecting the waters (shown as O) with your mouse, clicking the A next to sele in the object pane, and then clicking remove atoms.
The image below shows this process.
Let's start by Hiding everything (1UBQ → H → everything). Next, show the cartoon representation of the protein (1UBQ → S → Cartoon) and show the sticks (1UBQ → S → Sticks). We can then color by atom type (1UBQ → C → by element). Coloring by element is a great way to highlight certain sections of the protein without losing the element information. We can accomplish this same sequence of manipulations by executing the following commands:
hide everything

show cartoon

show sticks

util.cbab
util.cbab command is a function whose name stands for "color by atom blue."
To access other colors, you can change the last letter of the function (e.g. util.cbag for green, util.cbac for cyan, util.cbam for magenta, etc.). See this wiki post for more information.
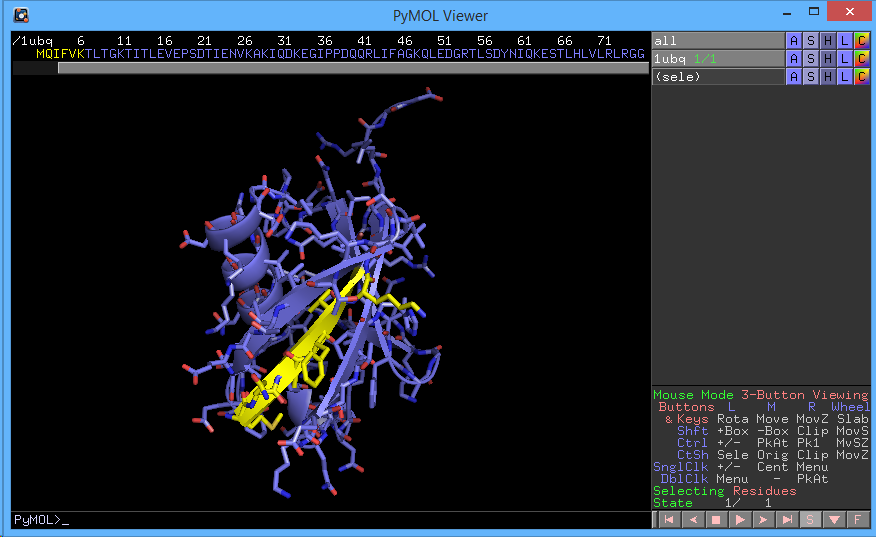
To show off a certain part of the protein, we can click and drag along the sequence to select certain residues.
For example, in the sequence viewer, click and drag from residue 1 to residue 6 to show the N-terminus.
Alternatively, type the following into the terminal:
sele resi 1-6
This selection is then saved as sele in the objects panel, and we can individually change the attributes of this selection through its menus.
For example, ((sele) → C → by element → yellow carbon) will highlight the selected amino acids. Alternatively, we can run the following command in the command line:
PyMOL> util.cbay sele
You should not have something that looks like the following:
You can save a selection through (sele → A → rename selection). This selection will then be saved for the rest of the session.
In case you're curious, we can also save the commands that we typed into the command line.
To do so, copy and paste the commands into a text file, and save it with the file extension .pml.
As an example, we've save the following commands into a text file that you can download here.
To run the commands, go to File → Run . . . , and then select the file that you just created in the dialog that opens.
Selection logic
One of the most powerful features of PyMOL is the ability to make selections based on different criteria.
To get started, let's read the documentation for the select command.
Type help select, and then hit the escape key.
This will show the command window in the main window, and it will show the documentation for the select command.
The general syntax for the select command is select selection_name, selection_criteria, where selection_name is the name of the selection that we're creating, and selection_criteria defines how the selection is made.
Let's start by selecting all of the lysines
sel lysines, resn lys
This means that we want to make a new selection called lysines by selecting all residues with a name (resn) that is lysine (lys). We can make these lysines blue (lsysines → C → Blues → Blue).
color blue, lysines
Let's also select the prolines as well
sel prolines, resn pro
Before we continue, let's make the protein gray (color gray).
Now, let's make a compound selection by selecting aspartic and glutamic acids.
The syntax for making a selection that is either aspartic acid or glutamic acid is asp+glu.
sel acids, resn asp+glu
We'll also select all of the bases
sel acids, resn arg+lys+his
We can select by attributes other than the type of residue. For example, we can select residues by their indices:
sel Q31, resi 31
Here resi refers to residue index. Another useful selection type is name, which will select by the atom name of each element.
sel oxygens, name o
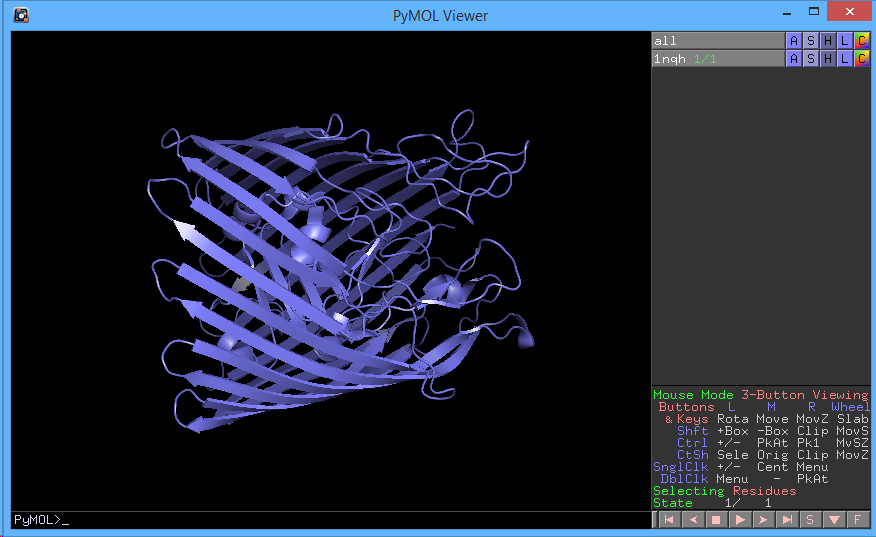
Before we move on, let's reinitialize PyMOL and load a new structure.
rein

fetch 1nqh

hide everything

show cartoon

color slate
You should have the following:
Now, let's show the sequence (Display → Sequence). If you notice, the first six amino acids are missing. It's likely that they were deleted because they had low resolution. Scroll all the way to the right in the sequence viewer. There are also four residues with the name CA. These are calcium ions that were resolved during the crystallography. Let's show them:
select calciums, symbol ca

show spheres, calciums

color gray, calciums
You'll also notice that there's a residue with the name CNC. This is vitamin B12. Let's show it and change it's color to show it off. In the objects pane, (sele → S → sticks) color the ligand yellow (C → by element → yellow). Let's highlight the cobalt ion
select b12, resn CNC

show sticks, b12

util.cbay b12
This ligand also has a cobalt ion at its center.
select cobalt, symbol co

show spheres, cobalt
Once we've made a selection, we can modify that selection (A → modify → extend → ). We can extend the selection through covalent bonds or through space.
select b12, resn cnc

select neighboring, byres b12 expand 5
This will select every residue with any piece within 5 angstroms of the ligand.
Surfaces
Let's start by getting rid of everything and showing the surface
hide everything

show surface

show sticks, b12
This will show a surface of the protein obtained by rolling a 4 angstrom ball over the protein surface. We can also see how the vitamin fits into the protein binding pocket. Let's also look at all of the lysines and the hydrophobic side chains.
color green, resn lys
color gray, resn phe+trp+leu+ile+met
We can now see that there are two conspicuous regions of the protein, one with hydrophobic regions and one with hydrophobic residues. This suggests that this protein is membrane-associated.
Sometimes showing surfaces will cause the program to crash. It's wise to save before showing surfaces, and by reducing the quality of the surface by changing the value of \texttt{surface\_quality}. The default is 0, but for large structures like MS2 and TMV the best value is usually -1 or -2. Changing \texttt{surface\_solvent} can help to make low-quality surfaces look better.
set surface_quality, -1

set surface_solvent, on
Let's go back to normal, though.
set surface_quality, 0

set surface_solvent, off
Making figures
The default pymol view is not very high resolution. During regular display, Pymol doesn't anti-alias the view (smooth blending). To make a better figure, we ray-trace the image to include high-resolution shadows and graphics.
ray
We can then save the resulting image (File → Save image as). To explicitly indicate the image size to save, type the following
png ~/Desktop/image.png, width=10cm, dpi=300, ray=1
Sometimes we also want a transparent background (Display → Background → Opaque). Now when we ray-trace, the background will be transparent. There are also a few settings to make the ray-traced figures look better.
set fog, 0

set specular, 0

set ray_shadow, 0

set depth_cue, 0
We can also control the transparency of the surface
set transparency, 0.5
Slabbing
In order to look inside of proteins, we have to use the slab feature. Slabbing is controlled by the mouse wheel, or by whatever controls scrolling on your laptop. In general Pymol doesn't do this very well. Chimera is much better at providing slices through the protein.
One hack is to hide the residues in the front. You can hold down shift while dragging the mouse to select a range of residues. Then you can hide the specific representations that you don't want to see. You can then complete the selection (sele → A → modify → complete → residues)
Measurement
Go to Wizard → Measurement. Click one atom and then another atom. Pymol will draw a line between the two with the distance in angstroms listed. When you're finished, click done.
Mutations
Let's go to Wizard → mujjtagenesis. Click on the residue that you want to mutate. On the right, you should see a list of menus. Click on No Mutagenesis and select Cys. We also have to select the possible rotamers that could be here. On the bottom, there is a series of buttons for stepping through the possible conformations. When you find one you like, you can click Apply.
Let's start by showing the sticks
show sticks